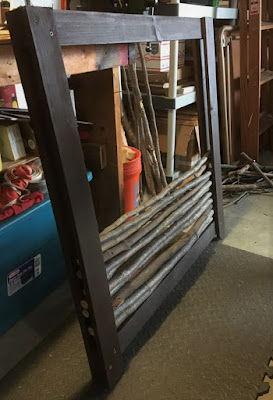
During the fall I trimmed a lot of trees in the backyard. While on a long walk one day, I came up with the idea to build a small fence with them. A fence that would help keep the leaves from blowing into the porch area.
It worked! :)
In case you were wondering and want to build one yourself, it's pretty easy to build a fence like this.
The Frame
The first thing to decide, what material to use for the structure. I decided to use red pine fence pickets. I got them at Home Depot, 5/8" x 5.5" x 6'. They were $1.97 each. For each fence section (36" x 36"), I needed two pickets. Not too bad, $3.94 in wood cost per section, with a little bit leftover to use for the next section. Fortunately I have both a miter saw and a table saw so I was able to cut these to the sizes I needed.
First, on the miter saw, cut each picket in half, roughly 36 inches.
Next, each 36 inch piece had to be ripped in half on the table saw.
Painting is optional. I decided to paint these a dark brown.
About the saws, at a minimum you will need a miter saw or at least some way to cut your wood into 36 inch pieces. If you do not have a table saw, you do have another option. Instead of using the 6 foot pickets that need a lot of cuts, you could use 3 inch wide cedar planks. You would not have to do any ripping, thus no need for a table saw. The only downside to this approach is material cost. The cedar planks at Home Depot, 3/4" x 3" x 8' cost $8.64. For each fence section you would need three planks, $25.92. Big difference compared to the $3.94 per fence section cost with the red pine fence pickets. There are many types of wood to choose from. The main thing to keep in mind when selecting is picking one that will hold up to the weather.
Next, put these together in squares and screw them together. Be sure to make sure they are square. Also, it's best to use exterior screws.
A tip my dad taught me to make sure something is square, measure the distance of opposite corners. If they're the same, it's square.
You may need to add spacers (like I did on this section) in all four corners. You will need to do this if your branches are thicker.
Final step for the frame, screw in the two side pieces. You can now see the gap where you put the branches.
The vice made the cutting so much easier being able to secure each branch. Once cut, you insert into the frame. There is no need to secure them.


